SAP ByDesign natively supports the generation of text files that can be provided to your bank to initiate actual bank transfers.
The file format is configurable to allow you to arrange the standard fields you need into the order that your bank requires.
However, there are a few options out of the box and customizations that we can perform to take your generated file to the next level that your bank may require. If you need to complete a money transfer, make sure that you’re doing it in a protected manner with the right type of software designed the way you need it to.
First, you can choose between specific field length and delimited fields. Specific field length requires that each field is exactly the correct number of characters defined in the file specification that the bank requires.
The field delimiter is specified to be whatever delimited is required – for example, if the bank requires a .CSV file, then the delimited will be a “,”. Note that the payment file generation doesn’t have native string encapsulation, so if you include something like the Name of your Supplier (and that Supplier has a comma), then that may cause the file to not be parsed correctly.
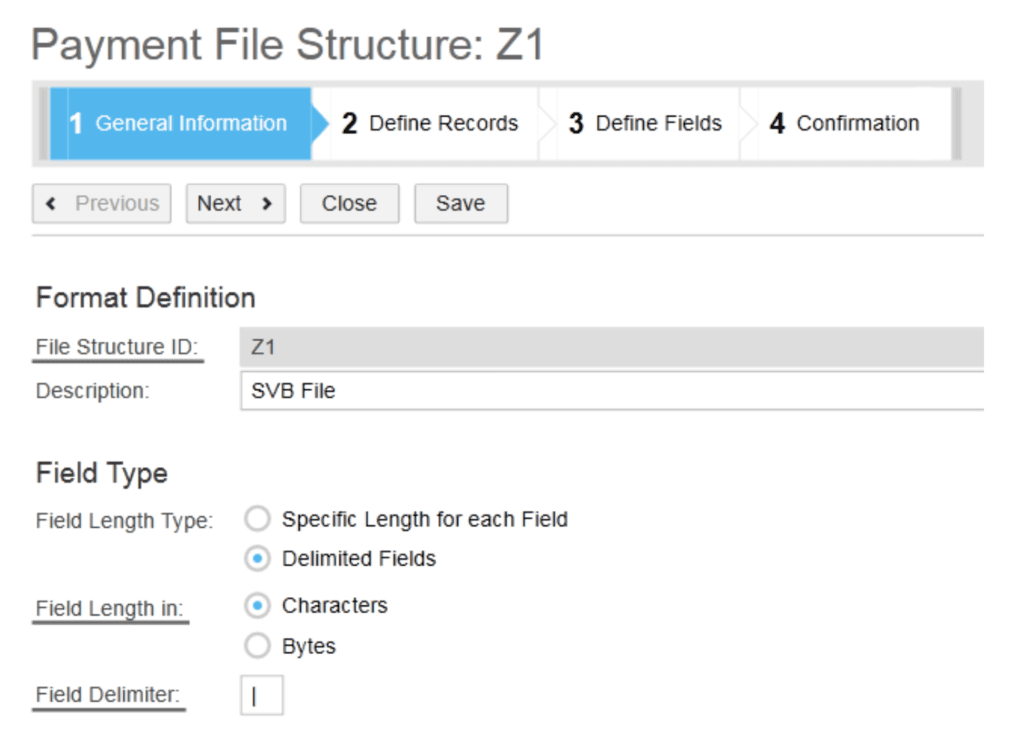
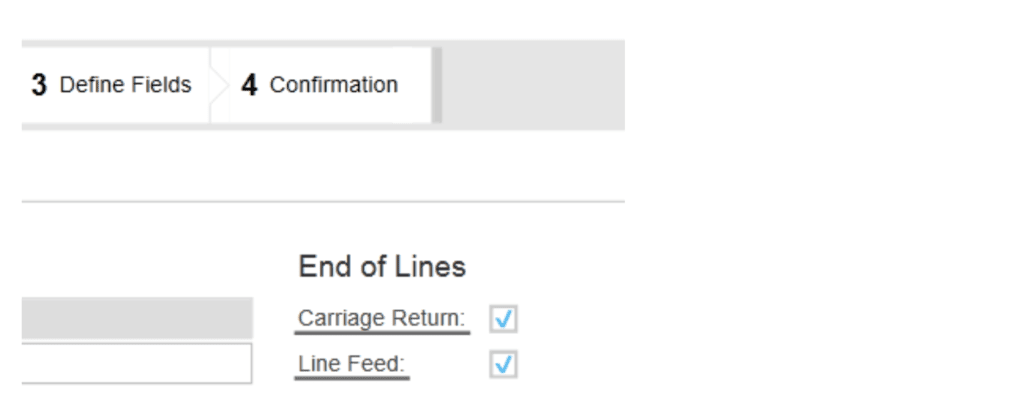
You can also define the whether the end of each line should have a Carriage Return and/or Line Feed. This is generally within the file specifications provided.
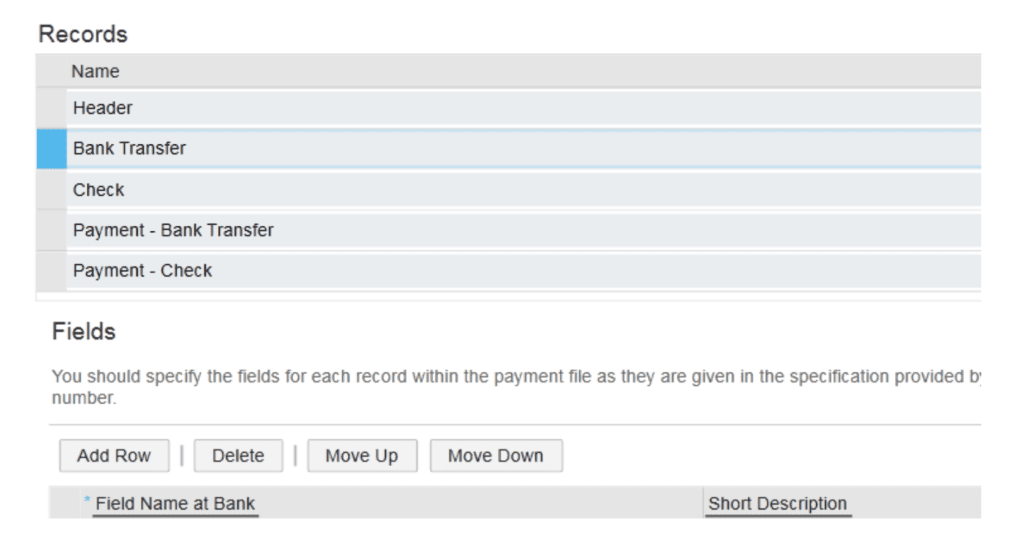
The next step is to set up the Record Definition. This describes the reoccurrence of the lines of the generated file. The actual data fields in each line will be defined within the next step. There are three types of lines that can be specified within the Level field:
For example, if we have a file with two payments that each pay 4 invoices, then we will have:
Note that the file specification pictured actually has two Payment Transaction rows and two Payment Item rows. This isn’t because we want duplicate rows, but because we can use Conditions.
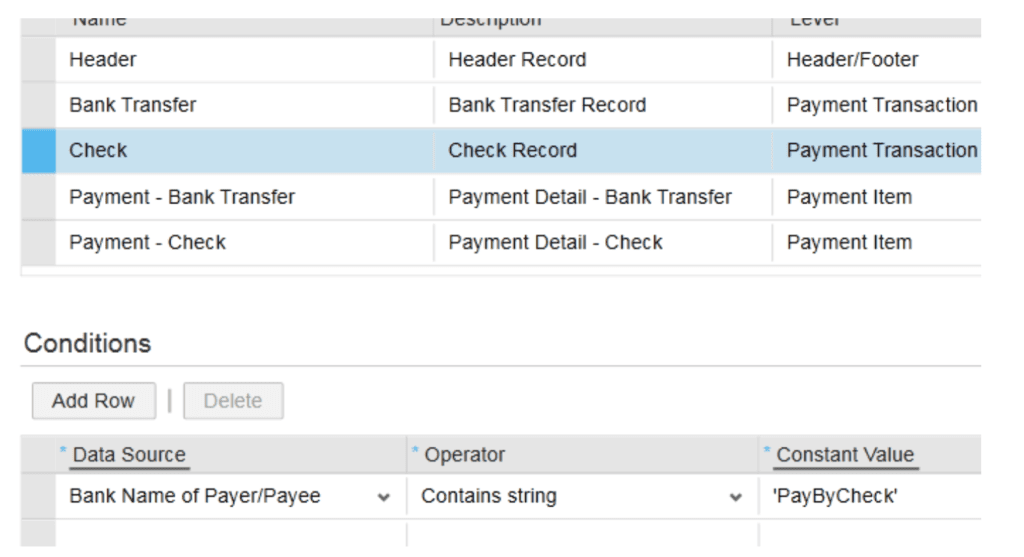
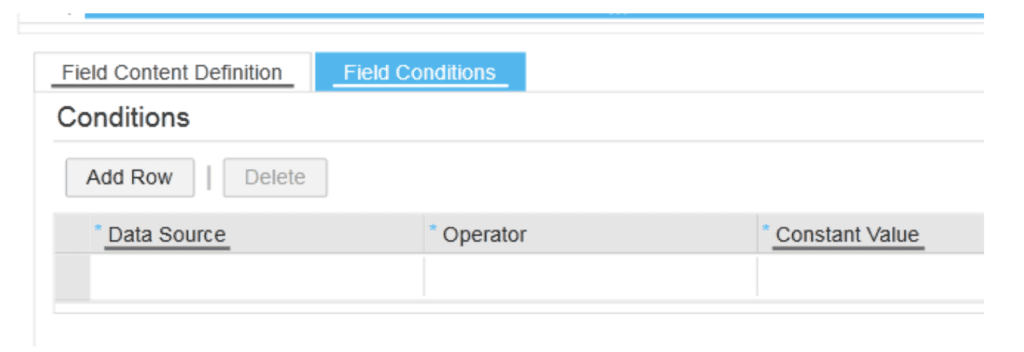
A condition controls whether or not a row will appear. If the condition is met, the row will appear. In the example below, we can see that the row with the name “Bank Transfer” will appear as long as the Bank Name of the Payer/Payee is not ‘PayByCheck’.
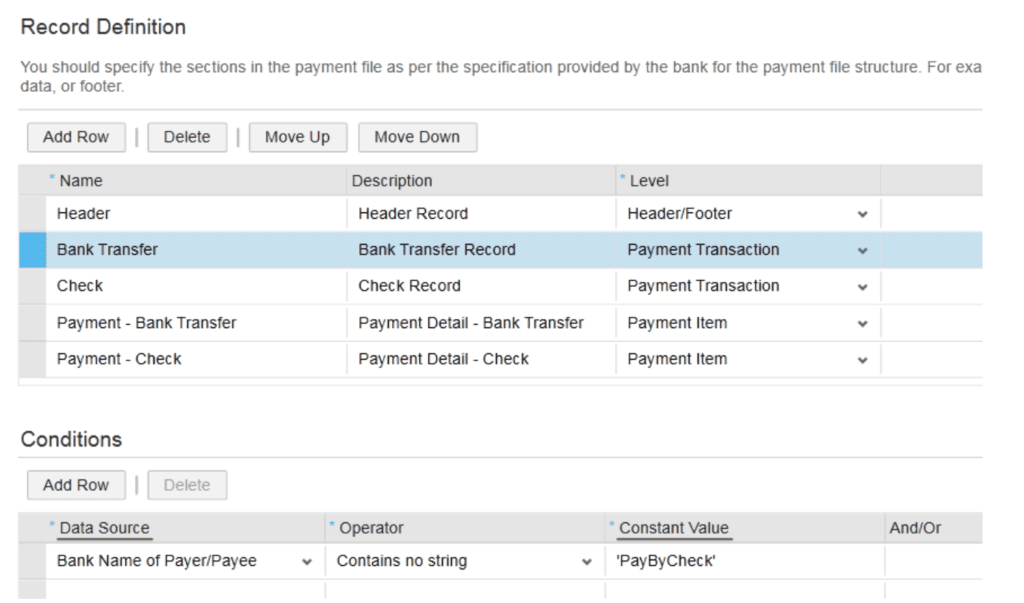
The row with the name Check has the condition that it will only appear if the Bank Name of the Payer/Payee is ‘PayByCheck’.
With the two conditions defined, we can have only a single row appear for each transaction, but the row that does appear will have a different field structure depending on the type of payment.
Generally speaking, this is the easiest approach for handling combined data with multiple different types – while the data fields also have conditions, those conditions still are only used to control visibility, not the actual data itself.
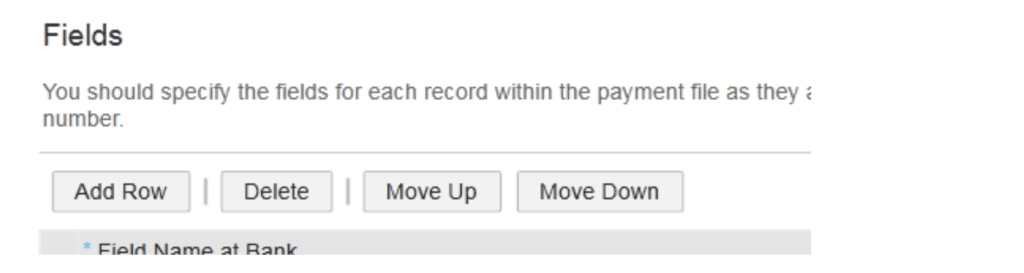
The next step of the process is to actually define the fields for each row. To do this, select the row within the Records table, then select the field in the Fields table.
As the order of the fields does matter in the generated file, you can move a field up or down in the sequence. To do this, select the field and click Move Up or Move Down. Note that Add Row simply adds a new field at the bottom of the list, so you’ll have to move any newly added field to the appropriate position.
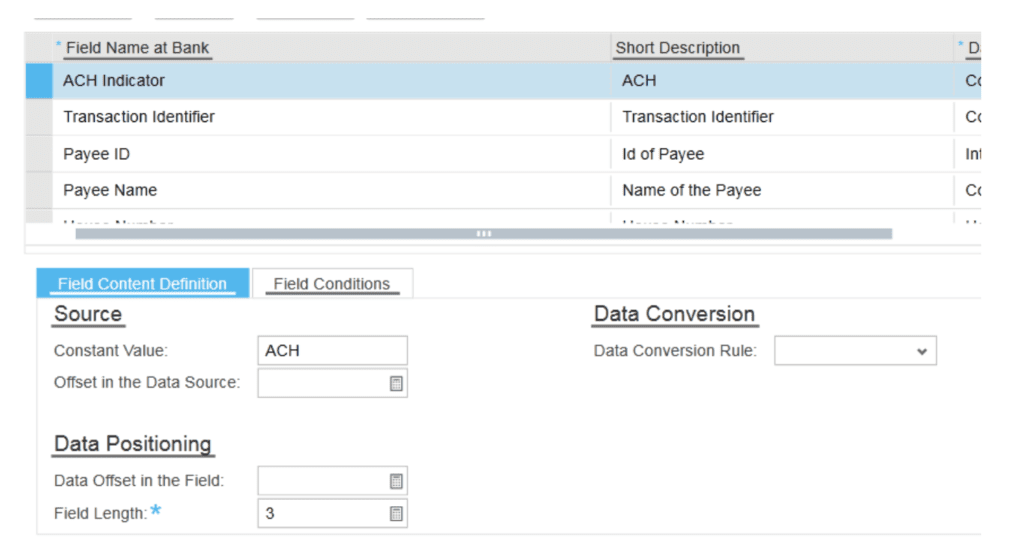
For each field, you’ll need to enter a few values. The Field Name at Bank and Short Description are entirely informational (they don’t appear on the file at all), so the values here don’t necessarily have to match the specification provided.
Every field also has to have a Field Length specified, but when using a delimited file, it’s not as critical that the value here is exact. Just make sure the Field Length is at least as long as the expected value of the field in the Data Source. If it isn’t, then the value in the generated file will be truncated to the Field Length specified in configuration.
The simplest field you can use is one with the Data Source value of “Constant”. This is used to indicate the field will always have the same value, which you can specify in the Constant Value field in the Source section.
For all the fields that should be populated based on data in the system, you’ll need to specify a value in the Data Source column. These are fairly self-explanatory, and will be pulled from the actual data related to the transaction. For example, the “Internal ID of Payee” will retrieve the Business Partner ID of the Payee on the payment itself.
Note that you can use any Data Source value for any type of row, but certain values may not make sense.
For example, any Data Source value that begins with “Payment Item…” is intended to be used only for the Payment Item type rows, but it can be used on the Payment Transaction type rows as well – however, only the value for the first Payment Item will appear.
On the other hand, though the Internal ID of the Payee may be the same for each Payment Item, you can still include it in a Payment Item row.
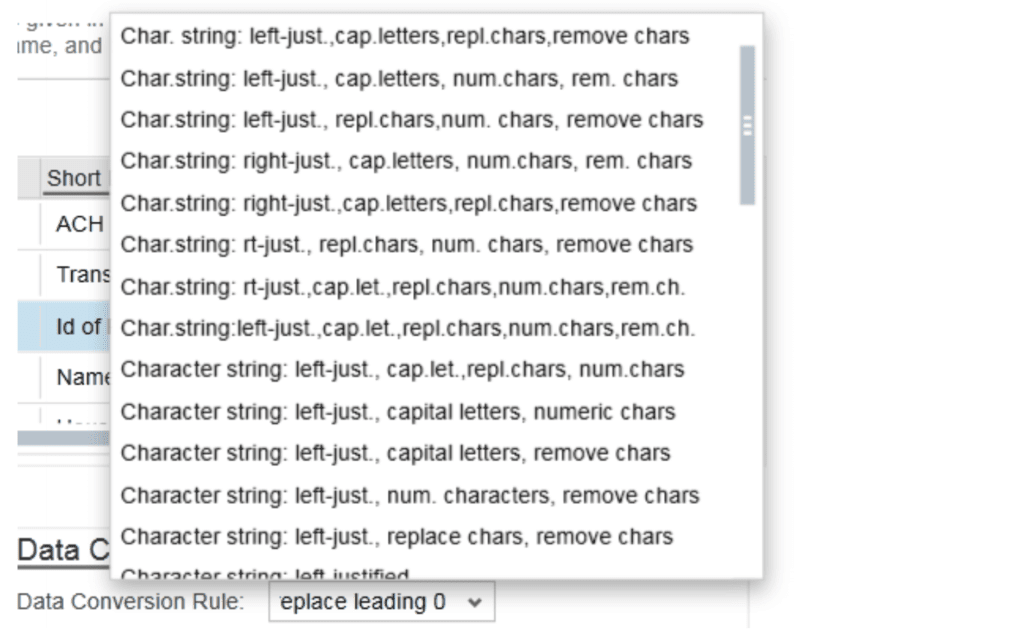
For each field, you can then include a Data Conversion Rule – this is used to convert the source value into the format that is in the required specification. The specific rules are outlined in the help documentation.

Field conditions can be used in the same way that row Conditions can be used. If a field meets the condition or conditions (as more than one can be used in a single field), then it will appear. If it does not meet the Condition, then it will be blank in the generated file.
There may be requirements that can’t be easily met using out-of-the-box functionality. For these, we can make use of the Cloud Application Studio to alter the generated file to meet custom requirements. Generally, the customization is used to replace one text value with another. Some example of modifications are listed below.
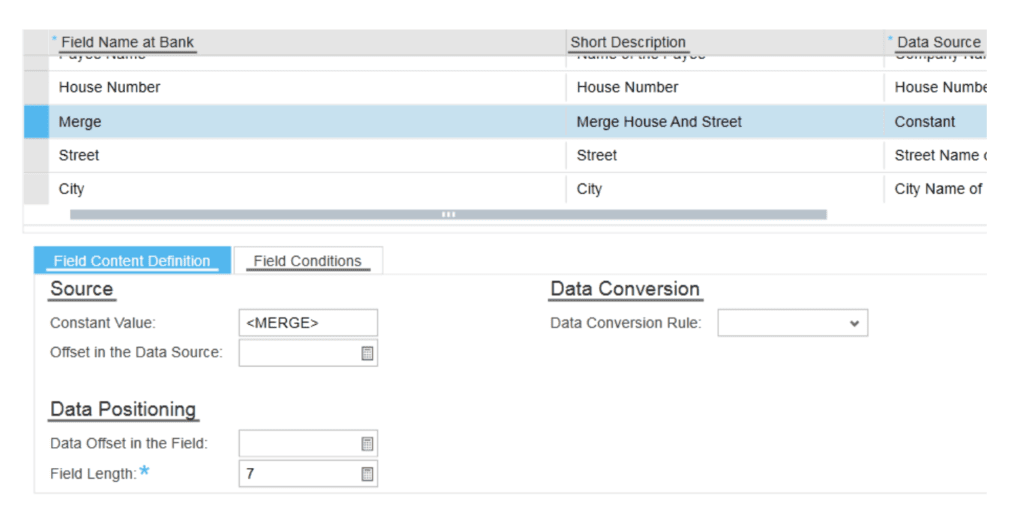
A simple example would be to combine two fields. In the example below, the House Number and Street Address are separate fields within the Data Source. In order to combine them into a single field, we include a Constant that indicates the two fields on either side should be merged. The custom script then removes the Constant value and two delimiters, which converts all three fields into a single field.
Another simple example would be to include the “+” or “-” sign in the Amount-type fields. Because the Amount fields don’t typically include the sign, this field would typically be separated by the standard delimiter. Through text-replacement, we can convert the sign and the amount into a single field. For example, we can convert the value “-|100” into “-100”, as well as converting “+|100” in only “100” without the “+” sign.
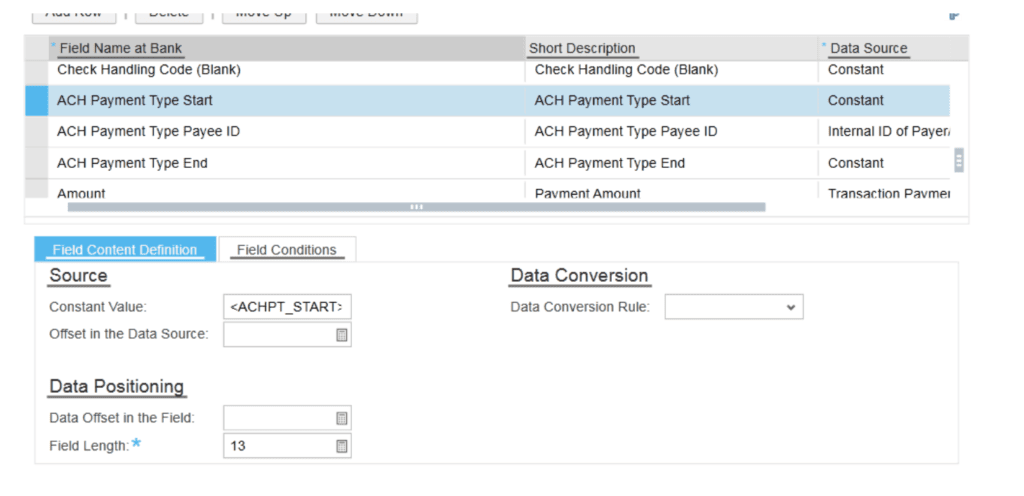
A more complex example is used in order to retrieve custom data that isn’t included in the Data Source list.
In this example, we retrieve a value from the Supplier Master Data. The ACH Payment Type Start and ACH Payment Type End are both Constant values that indicate to the code that the ACH Payment Type field between them will be replaced with the appropriate retrieved value.
The Internal ID of Payee specified in the ACH Payment Type is then used to retrieve the Supplier Master Data for that payee, and the value from the extension field replaces the three fields.
The extension field is placed on the Supplier Master Data to allow end users to populate the appropriate values that will be retrieved in the file.
The configuration and customization above is the basis for meeting nearly any use-case you may have for outbound payment file generation. As long is the information in stored in ByDesign, it should be retrievable for inclusion in the generated file.
Beyond that, there’s potential to directly transmit the file to your bank through web services. ByDesign has a native web service that can be used by your bank or a middleware solution to retrieve the generated files. Alternately, a custom code could be added in order to allow ByDesign itself to transmit the files to your bank over web services.
In short, ByDesign has the capabilities to support the generation of outbound bank files that can save time and improve accuracy for making outgoing payments and VistaVu has the capabilities to make sure you can meet whatever requirements are involved. Contact us for more help.

Our Manufacturing experts assess your needs and help you build a structured plan to reach business goals with technology adoption. Get in touch below.
.png?width=68&height=78&name=medal%20(1).png "medal (1)")


